Post Processing
 What is post processing?
Post processing is the phrase that we use to cover everything that is done to the photograph after it has been taken. The process has always been an important part of photography even in the days of film. Photographers would employ techniques such as dodging (lightening) and burning (darkening) to make their images more impactful and to guide the viewers eye through the frame.
Today the darkroom is our computer screen and although the process is very different the fundamentals are the same – we process our images to make them complete. Post processing is an integral part of the art of photography and in my opinion is something that you should practice and perfect if you want to make eye catching and impactful photographs.
RAW files and JPEG files – what are they?
There are two ways to capture images in camera. We can choose to shoot in RAW or JPEG.
A RAW file is a recording of all the information in the scene. It is unprocessed and a straight representation of what the camera “saw”.
A JPEG is a compressed edited file (the acronym stands for Joint Photographic Experts Group, after the group of people who created this method of compression).
When you take an image as a JPEG file the camera applies a series of algorithms to compress the file in camera. Due to this compression process any edits you make subsequently in post processing will result in a slight loss of quality.
In camera compression means that JPEG files are smaller than RAW files and they are suitable for using online or for print straight out of the camera. RAW files are not. They are much larger because they contain more data but they need to be processed so that you can print them or share them online.
You will notice that if you shoot in both RAW + JPEG mode, the RAW file will always be more flat in appearance and the JPEG more rich. This is because of the algorithms that are applied when the JPEG is created. Because RAW files contain unprocessed data any editing you subsequently do on them will be non destructive and you will always be able to revert back to the original ‘as shot’ file.
RAW files are much larger than JPEG’s and as a result contain much more information. Because of this they allow greater flexibility in post production.
RAW files also record at a greater bit depth than JPEG’s and so have more information recorded across the tonal range and in the shadows and highlights.
To sum up when you shoot in RAW you capture all the information from a scene in an uncompressed and raw state.
When you shoot in JPEG you are allowing the camera to compress your file and make decisions (by the use of algorithms) as to how it appears.
All my images are shot in RAW and are processed using Lightroom and Photoshop. This software is Licensed by Adobe and is available on a monthly subscription. The Photography Plan is £9.98 per month www.adobe.com
I have also been looking at alternative software for those who don’t wish to pay a subscription. Here I would recommend looking at
Affinity Photo which costs £69.99 as a one off fee. This works a little like Lightroom and Photoshop combined and allows you to do most of what the adobe packages offer. https://affinity.serif.com/en-gb/photo
Workflow
All my images are downloaded from the camera directly into my Lightroom catalogue. From here I will scroll through all the shots and work out which (if any) I want to process.
During my selection process I will be looking for the images with the best light, composition, exposure and mood. Even if shots are taken in close succession there will often be quite large differences between them so the selection process is critical. I find that the best images just jump out at you – they are usually obvious.
Post processing is an essential part of image making but it will never turn a bad photo into a good one. If the composition or light is not right in the original file no amount of post processing is going to rescue the image.
Post Processing is not cheating. It doesn’t somehow detract from the integrity of an image. To my mind it is a creative process which allows you to bring the best out of the information captured in the RAW file.
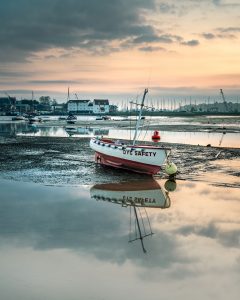
I will now go through my post processing workflow for the following image taken on Woodbridge waterfront.
Woodbridge Waterfront
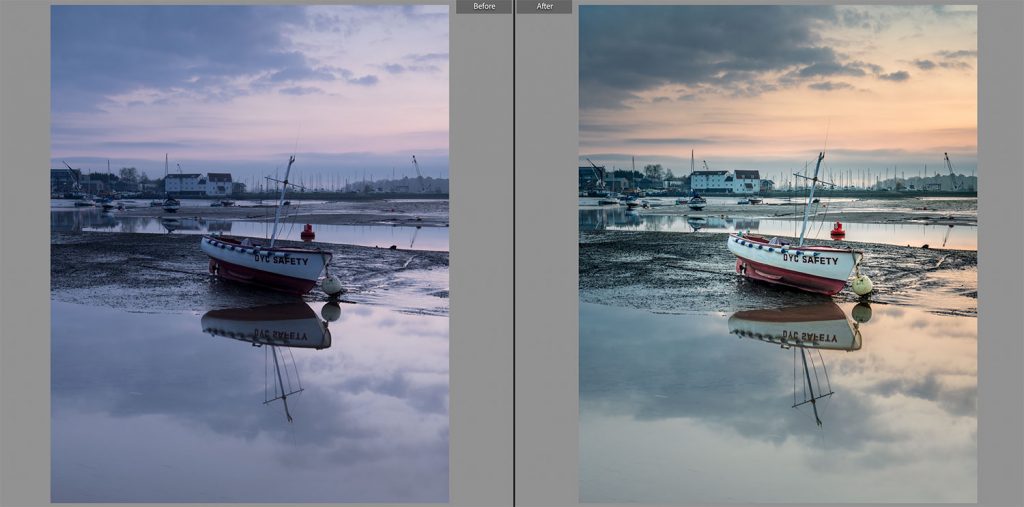
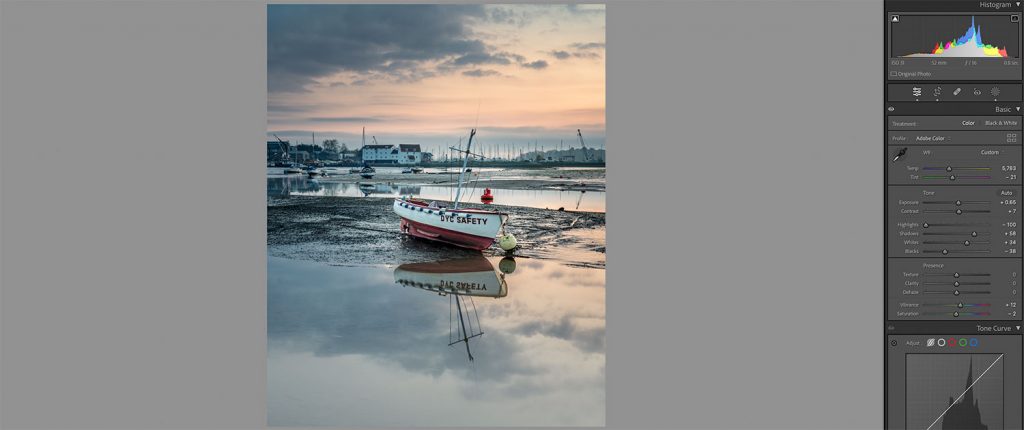
This screen shot shows my RAW file and my finished processed image. The image was taken with a white balance that wasn’t correct for the morning light – a mistake, but I wanted to show you how easy it is to rectify. Morning light before sunrise can often have a mauve tint, but not this much and the white balance is clearly wrong. The shooting settings were: 0.8 second at F16, ISO 31. I also used a 0.6 stop ND graduated filter.
To achieve the finished result I went through a process which I repeat with most of my images.
First I ask myself what I want to achieve – what are the important elements in the frame? Where do I want my viewer to look? How do I balance the light and tones around the image?
To begin with I changed the white balance by adjusting the colour temperature (warmer) and tint (more green, less mauve). I then brightened the exposure, reduced my highlights and lightened my shadows across the whole scene.
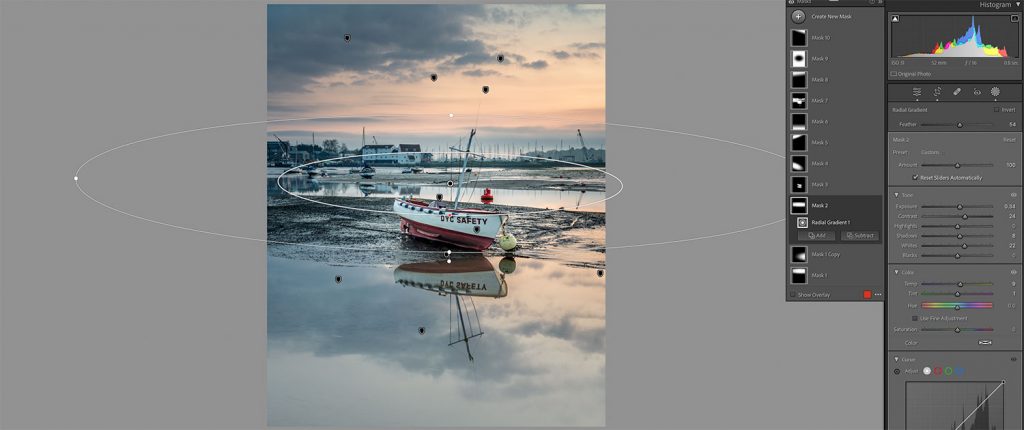
Having done this I used a series of selective masks to process individual parts of the image. These consisted for a mixture of linear gradients, radial filters and brushes. The locations of the different filters can be seen on the screen shot below. My aim with the processing was to make a connection between the boat in the foreground and the tide mill in the distance. Having finished my processing in Lightroom I then opened my image in Photoshop where I removed any dust spots or distracting elements (the spot healing and clone tools in Lightroom are very poor versions of the tools available in Photoshop) I also applied some dodging and burning to selected areas to enhance the visual pathway through the image.
I feel that the image is now a better representation of the scene that I saw.
If you are struggling with your post processing and would like to see what can be achieved I run courses in Lightroom and Photoshop either in my studio in Hollesley or online over Zoom.
During may I am running a competition to win a 2 hour Lightroom session which will be delivered over Zoom. The competition is free to enter – find out more here